저번 Text 설명 1편에 이어서 2편을 작성해보도록 하겠습니다.
Text는 크게 색다로운 내용이 있다긴 보다 되짚어보는 정리정도 되는거 같습니다.
2편 같은 경우 사용자 상호작용 개념이 있어서 1편보다는 좀더 좋은 기능을 설명하고 있습니다.
1. 사용자 상호작용
사용자 상호작용을 사용 설정할 수 있는 다양한 API를 설명합니다.
- 여러 Composable 레이아웃에서 더 유연하게 텍스트를 선택할 수 있음
- Text Composable 의 부분에 제어자를 추가할 수 없어서 Text의 사용자 상호작용은 다른 Composable 레이아웃과 다름
1) 텍스트 선택하기
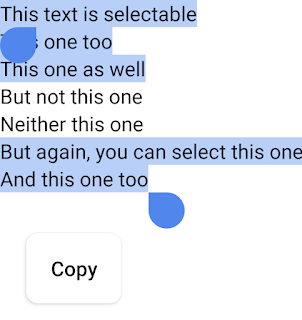
기본적으로 Composable은 선택할 수 없습니다.
텍스트 선택 기능을 사용 설정하려면 Text를 SelectionContainer Composable로 래핑해야 합니다.
@Composable
fun SelectableText() {
    SelectionContainer {
        Text("This text is selectable")
    }
}@Composable
fun PartiallySelectableText() {
SelectionContainer {
Column {
Text("This text is selectable")
Text("This one too")
Text("This one as well")
DisableSelection {
Text("But not this one")
Text("Neither this one")
}
Text("But again, you can select this one")
Text("And this one too")
}
}
}2) 텍스트에서 클릭 위치 가져오기
Text의 클릭을 수신 대기하려면 clickable 추가하면 됩니다.
Text Composable 내에서 클릭 위치를 가져오려면 ClickableText를 Text Compsable 대신 사용합니다.
@Composable
fun SimpleClickableText() {
    ClickableText(
        text = AnnotatedString("Click Me"),
        onClick = { offset ->
            Log.d("ClickableText", "$offset -th character is clicked.")
        }
    )
}
3) 주석(tag)이 추가된 클릭
사용자가 Text Composable을 클릭할 때 특정 단어에 연결된 하이퍼링크 같이 Text 값에 정보를 추가할 수 있습니다.
- tag(String), annotation(String), 텍스트 범위를 매개변수로 사용하는 주석을 추가해야 함
- AnnotatedString에서 이러한 주석을 태그 또는 텍스트 범위로 필터링
- buildAnnotatedString은 AnnotatedString 객체를 만드는 inline function이다.
buildAnnotatedString을 이용해 만들어진 AnnotatedString은 하나의 Text 안에서 여러 스타일을 적용할 수 있도록 하는 정보를 담은 객체로 AnnotatedString 속에는 텍스트의 스타일에 대한 정보를 담은 text, spanStyles, paragraphStyles, annotations 객체들이 저장되어 있다.
@Composable
fun AnnotatedClickableText() {
    val uriHandler = LocalUriHandler.current

    val annotatedText = buildAnnotatedString {
        append("Click ")

        // We attach this *URL* annotation to the following content
        // until `pop()` is called
        pushStringAnnotation(tag = "URL", annotation = "https://developer.android.com")
        withStyle(style = SpanStyle(color = Color.Blue, fontWeight = FontWeight.Bold)) {
            append("here")
        }

        pop()
    }

    ClickableText(
        text = annotatedText,
        onClick = { offset ->
            // We check if there is an *URL* annotation attached to the text
            // at the clicked position
            annotatedText.getStringAnnotations(tag = "URL", start = offset, end = offset)
                .firstOrNull()?.let { annotation ->
                    Log.d("Clicked URL", annotation.item)
                    uriHandler.openUri(annotation.item)
                }
        }
    )
}
2. 텍스트 입력 및 수정
- TextField를 사용하면 유저가 텍스트를 입력하거나 수정할 수 있습니다.
- 디자인이 Material TextField 또는 OutlineTextField를 호출하는 경우 TextField를 사용하는 할것을 권장
- 머티리얼 사양의 장식이 필요하지 않은 디자인을 빌드하는 경우 BasicTextField를 사용해야함
(1) TextField는 머티리얼 디자인 가이드라인을 따라 구현됨
- 기본 스타일이 채워짐
- OutlinedTextField는 위 스타일 버전입니다.
(2) BasicTextField는 유저가 키보드를 통해 텍스트를 수정할 수 있지만 힌트나 자리표시자 등등은 제공하지 않음
예제1. TextField
@Composable
fun SimpleFilledTextFieldSample() {
    var text by remember { mutableStateOf("Hello") }

    TextField(
        value = text,
        onValueChange = { text = it },
        label = { Text("Label") }
    )
}
예제2. outlinedTextField
@Composable
fun SimpleOutlinedTextFieldSample() {
    var text by remember { mutableStateOf("") }

    OutlinedTextField(
        value = text,
        onValueChange = { text = it },
        label = { Text("Label") }
    )
}
1) TextField 스타일 지정
TextField 및 BasicTextField는 커스텀 할 수 있는 많은 공통 매개변수를 공유합니다.
TextField의 전체 목록은 아래링크에서 확인할 수 있습니다.
다음은 자주 사용하는 매개변수 목록입니다.
- singleLine
- maxLines
- textStyle
@Composable
fun StyledTextField() {
    var value by remember { mutableStateOf("Hello\nWorld\nInvisible") }

    TextField(
        value = value,
        onValueChange = { value = it },
        label = { Text("Enter text") },
        maxLines = 2,
        textStyle = TextStyle(color = Color.Blue, fontWeight = FontWeight.Bold),
        modifier = Modifier.padding(20.dp)
    )
}
2) 키보드 옵션
TextField를 사용하면 키보드 레이아웃과 같은 키보드 구성 옵션을 설정하거나 키보드에서 지원하는 경우
이래 지원되는 키보드 옵션들 입니다.
capitalization
autoCorrect
keyboardType
imeAction
위 자세한 설명은 이 링크를 참조
3) 형식 지정
- TextField를 사용하면 입력 값에 형식을 설정할 수 있습니다.
- 비밀번호를 나타내는 문자를 *로 바꾸거나 신용카드 번호의 4자리마다 하이픈을 삽입할 수 있습니다.
@Composable
fun PasswordTextField() {
    var password by rememberSaveable { mutableStateOf("") }

    TextField(
        value = password,
        onValueChange = { password = it },
        label = { Text("Enter password") },
        visualTransformation = PasswordVisualTransformation(),
        keyboardOptions = KeyboardOptions(keyboardType = KeyboardType.Password)
    )
}
4) Focus 처리
많은 사용자들이 앱에서 텍스트를 타이핑을 한 후 키보드가 아닌 다른 곳을 터치하여 키보드를 닫는 UX에 익숙할 것입니다.
이전까지는 이 처리를 위해 Activity에서 currentFocus를 이용해 Focus를 해제하는 방식을 사용했습니다.
//Activity에서 currentFocus를 이용해 Focus를 해제하는 방식
override fun dispatchTouchEvent(ev: MotionEvent): Boolean {
    if (currentFocus is EditText) {
        SoftInputUtils.hideSoftInput(currentFocus)
        currentFocus!!.clearFocus()
    }
    return takeDispatchTouchEvent(ev)
}
그렇지만 TextField는 Composable 함수이기 때문에 위와 같이 특정 객체인지 판단할 수 없었습니다.
그래서 TextField의 포커싱 여부를 판단하는 변수를 하나 두어 처리해야 했습니다.
어렵지 않은 작업이었지만 이 처리를 하면서 명령형 UI와 선언형 UI의 차이가 조금씩 체감이 되었습니다.
var isTextFieldFocused = false

@Composable
fun MainContent(vm: MainViewModel) {
    val focusRequester by remember { mutableStateOf(FocusRequester()) }

    BasicTextField(
        value = ...,
        modifier = Modifier
            .focusRequester(focusRequester = focusRequester)
            .onFocusChanged {
                isTextFieldFocused = it.isFocused
            }
    )
}

override fun dispatchTouchEvent(ev: MotionEvent?): Boolean {
    if (isTextFieldFocused) {
        SoftInputUtils.hideSoftInput(currentFocus)
        currentFocus!!.clearFocus()
    }
    return takeDispatchTouchEvent(ev)
}
위의 방식은 단점이 있다. TextField 가 늘어날 때마다 변수를 새로 생성해 주어야 한다.
다음의 방식으로 해결이 가능하다.
TextField가 아닌, 그것을 감싸고 있는 전체 화면의 터치 이벤트를 캐치해서 포커스를 해제하는 방법이 있다.
detectTapGestures로 태핑을 감지하여 포커스를 해제하면 된다.
Composable을 깔끔하게 쓰기 위해 Modifier의 Extension에 함수 추가
// 터치 이벤트 감지하여 포커스 해제
fun Modifier.addFocusCleaner(focusManager: FocusManager, doOnClear: () -> Unit = {}): Modifier {
    return this.pointerInput(Unit) {
        detectTapGestures(onTap = {
            doOnClear()
            focusManager.clearFocus()
        })
    }
}
그리고 TextField를 Column으로 감싸주고, Column을 터치할 때 위에 만들어준 함수로 포커스를 해제하도록 만들었다.
@Composable
fun MainContent() {
    val focusRequester by remember { mutableStateOf(FocusRequester()) }
    val focusManager = LocalFocusManager.current
    var text by remember { mutableStateOf("안뇽") }

    Column(modifier = Modifier
        .fillMaxSize()
        .addFocusCleaner(focusManager) //최상단 전체화면의 터치이벤트 감지하여 해제
    ) {
        TextField(
            value = text,
            onValueChange = {
                text = it
            },
            modifier = Modifier
                .focusRequester(focusRequester = focusRequester)
        )
    }
}
아래 링크에서 더 다양한 예제들을 볼 수 있습니다.
**정리
- Compose 의 클릭영역은 SelectionContainer Composable로 TextComposable를 감싸서 만들면 사용할 수 있게 됨
- SelectionContainer 안에서 클릭영역 허용하지 않을 공간을 DisableSelection Composable로 설정할 수 있음
- Text대신 CilckableText Composable 를 사용하면 유저가 클릭한 좌표를 가져올 수 있음
- 추가된 클릭 표시를 하려면 AnnotatedString를 사용해서 tag , anotation 매개변수를 설정하면 됨
- TextField 사용하면 유저가 글을 수정할 수 있게끔 됨 (xml의 editText 대신)
- TextField는 기본 제공되는 스타일이 존재 , BaseTextField는 힌트나 자리표시자 등등을 제공하지 않는 기본 형식
- BaseTextField는 머트리얼 디자인 가이드를 따르지 않고 쓸때 사용하기를 권장
- TextField에서 사용자가 글을 입력시 표시되면 글 형식을 지정할 수 있음 (ex: 패스워드면 **)
- TextField에서 키보드 옵션 설정 가능
참고
https://developer.android.com/develop/ui/compose/text/user-interactions?hl=ko


댓글 없음:
댓글 쓰기